
You’ve heard how much I love the Magic Action Box for capturing email sign ups to the newsletter. The problem is, the Magic Action Box only gives you the option for an email address. No first or last name.
I was asked last week how I’ve been able to achieve that on my opt-in boxes – see the end of this post for an example. The thing is, you can fiddle with the code – which, if I’m honest, took me ages to figure out – so you can grab an email AND name.
I’m no code expert, but once you know how (and yes, I do now) you can easily add in simple code to grab information for your MailChimp account. This means you’re able to add a personal touch by using the person’s name in your next newsletter.
OK, so research shows the less you ask from people when signing up, the higher the number of email sign ups you’ll get. However, I’d also argue that people like to be called by their name in an email – even if they know it’s not really a letter JUST to them.
So, how do you do it? Well, I’ve decided to share this, because I know how frustrating it was for me to figure out. So here goes:
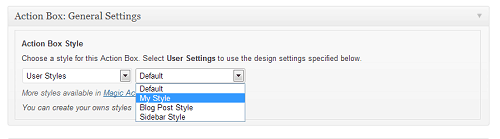
1. Go through the steps in the previous post to create an opt-in box. I clicked on “My Style’’ so I could customise the colours and look of the box. That’s a whole other post though. You can select the pre-done option if you prefer.
 2. When you get to the point of having to take the code from MailChimp, you can tweak that code to include “name’’ and “last name’’ if you wish. We’ll focus on just name as, really, that’s all you should require from someone for an email signup. Rarely will you refer to someone by their sir name in an email newsletter. And, as I said, in many cases it will decrease the number of sign ups you get if you ask for too much information.
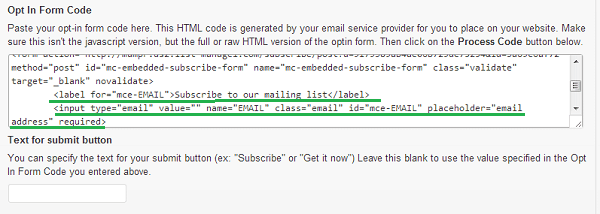
3. Add in a code line to include grabbing their name. This is what the original code looks like. The code specifically for grabbing the email address is underlined in green.
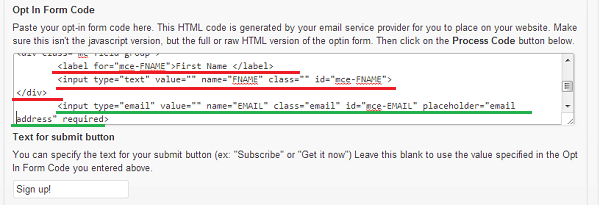
4. This is the bit of code you need to add in to grab their name – underlined in red:
Written out in full, the code looks something like this when you grab it from MailChimp (note: I’ve taken out my subscriber link – highlighted by the text in red – and have placed the new piece of code in green):
<!– Begin MailChimp Signup Form –>
<link href=”http://cdn-images.mailchimp.com/embedcode/slim-081711.css” rel=”stylesheet” type=”text/css”>
<style type=”text/css”>
#mc_embed_signup{background:#fff; clear:left; font:14px Helvetica,Arial,sans-serif; }
/* Add your own MailChimp form style overrides in your site stylesheet or in this style block.
We recommend moving this block and the preceding CSS link to the HEAD of your HTML file. */
</style>
<div id=”mc_embed_signup”>
<form action=”INSERT YOUR SUBSCRIBER URL GENERATED BY THE CREATE FORM EMBED CODE PAGE” method=”post” id=”mc-embedded-subscribe-form” name=”mc-embedded-subscribe-form” target=”_blank” novalidate>
<label for=”mce-EMAIL”></label>
<div>
<label for=”mce-FNAME”>First Name </label>
<input type=”text” value=”” name=”FNAME” class=”” id=”mce-FNAME”>
</div>
<input type=”email” value=”” name=”EMAIL” class=”email” id=”mce-EMAIL” placeholder=”email address” required>
<div class=”clear”><input type=”submit” value=”Subscribe” name=”subscribe” id=”mc-embedded-subscribe”></div>
</form>
</div>
<!–End mc_embed_signup–>
I hope that helps. I know code can be confusing, but just knowing a few basics can help you achieve what you want.
How did you go? Feel free to leave any questions below.
[…] READ MORE: Learn how to customise your newsletter opt-in box […]