When I visit a Facebook page, I get drawn by what Facebook tabs they have. They’re those windows that used to be underneath the Facebook timeline cover but are now positioned in the sidebar. They can point you to other avenues of a person’s business or blog.

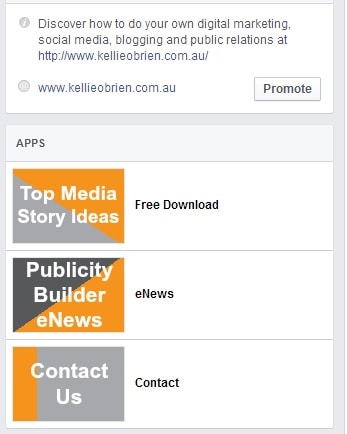
As you can tell from my Facebook tabs, I have a free download, my eNewsletter sign up page and a Contact page. This is all about growing my email list and making sure people have an easy way to contact me.
So, how do you create them? There’s quite a few options you can use and all quite easily done! I’ll share a couple of those over the next two days. But first…
My personal blog uses ShortStack. Here’s how to do it:

1. Sign up to ShortStack.

2. Click Create Tab or Create Tab from Template. I generally click the latter.

3. Choose one of the templates on the left hand side. There are plenty there, depending on what you want to create.
4. Click “Make Tab’’
5. Each template, at the bottom of the page, has a “how to’’. Here’s a quick overview for creating a Pinterest tab using the Pinterest template, just to show you how easy it is.
6. Go to your Pinterest profile, click your photo and grab the URL of that page – eg http://pinterest.com/kelliethreelil

7. In ShortStack, click Header Text & Button Rich Text Widget, click on the Follow Me On Pinterest image and use the hyperlink button (the chain) to replace the link’s address with your Pinterest URL mentioned above. Then SAVE.
8. To add more than one Pinterest board, as is shown above, take the URL of the Pinterest board you want (from Pinterest itself), similar to what was done with your profile URL.
9. Back in ShortStack, click the pencil on the RSS widget and paste the URL into the RSS Feed URL. Make sure it’s http NOT https. Go to the end of the URL and delete the “/” and replace with “.rss”. So, for example, the Public Relations board is http://pinterest.com/kelliethreelil/public-relations.rss Name the board by clicking on the title of the widget.
10. To make more boards, I clicked on the Clone Widget button on the Public Relations widget and followed all the steps above.
11. Choose a theme (I chose pink for Three Li’l Princesses to match my branding and, when I used it for Kellie O’Brien Media, I chose orange) and add a widget from the far left if you wish, including Like buttons, databases, products and more.

12. Next, you need to get it onto your page. So click Install Tab and then Choose Quick Publish. Click on the page you want it added to and you’re done! Sort of…
13. Next, you need to go to your Facebook page. You will see the tab under your timeline cover. Click it and you’ll be taken to your Pinterest feed via Facebook.
Our next post will go through another option for making tabs, plus following that I’ll show you how to easily make an image for your Facebook tab.
Feel free to leave comments or questions if you get stuck with any of this. The templates available on ShortStack mean you can create just about anything for your tabs.
If you’d love to learn more about increasing your reach and revenue on Facebook, learn more about my social media coaching package.
Yippeeee!! You are fabulous 😀
Thanks so much for sharing this Kelly I did it! I made my first tab. I am so excited as I have tried to do this a couple of times and it was just too hard. I will add another in a little while when my first e-book is ready, and will add one to for subscriptions to my newsletter. Thanks again. This is a really useful series.
Kyrstie
My pleasure, Krystie. I’m just so glad you’re able to do it now! ShortStack is fabulous for making these things so easy to set up! There are plenty of other third party apps too, but I’ve been particularly drawn to this one! 🙂
Oh thanks so much for this great info (plus the other #Blogfor30 posts, I have learnt so much from you, I appreciate the info you have shared with us. The facebook tabs are something I am going to do first. Thanks again.
Nice to know you’ve found it useful, Nellbe. That’s for that feedback.
Let me know how you go with the Facebook tabs. 🙂